Digital Hearing Aid Trimmers Adjustment
May 02, 2022
Hearing Aid Trimmers Adjustment
To adjust the controls, use a very small 3/64″ jeweler’s screwdriver. You can buy jeweler’s screwdriver sets ($10?) at stores like Radio Shack or many drugstores, usually a blue plastic box with a clear folding lid. Buy a jeweler’s magnifier loupe ($10?) at the same time so you can see the tiny labels identifying the controls– 4x isn’t enough for me, even 10x only barely enables me to read them.
First clean your ear canal of wax (cerumen). Do this at your own risk (doctors recommend against this), but I use Q-Tips very carefully, twisting them continuously as I insert them and as I pull them out. Absolutely never force the Q-Tip!! Or push it in to where it causes discomfort! Always do this yourself, never have someone else do it, because you yourself can feel any discomfort, and you probably will hear the increased rubbing sound when the Q-Tip is near your ear-drum letting you know when to quit, when the Q-Tip is “at the bottom”. Always control the Q-Tip yourself, NEVER have someone else control the Q-Tip (unless that person is a doctor or nurse of course).
Then trim the hair from your ear which may help your hearing and the fitting of the Open Ear Tip into the canal, and it may also help reduce itching irritation. You can buy these completely safe $10- $20 rotating hearing aid trimmers made for the purpose, spend some time inserting the trimmer many times into each ear, as they tend to bend many hairs down rather than cutting them, cutting only a few hairs on each insertion, but doing many insertions will get most of the hairs.
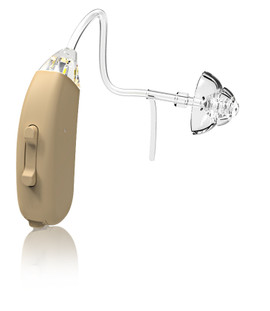
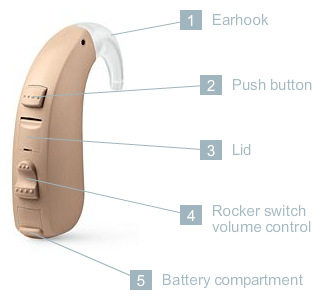
The door protecting the controls is between the volume rocker switch and the mode push-button. The door swings open on a hinge at mode push-button end. Open the door exposing the controls by gently inserting the screwdriver tip into the tiny slot hole near the plus end of the volume rocker switch and gently prying upward. The little door will swing open on its hinge which is at its end at the mode push-button.
Don’t ever adjust any control (here or elsewhere in your life) to the extreme end of its range either clockwise or counter-clockwise. Controls sometimes malfunction if put at their extreme end positions. Leave all controls always between the 5% and 95% positions.
You’ll have to try various settings over several weeks to get them the way you want them. But here is my approach to the initial trial setting.
The NH Low Frequency control is at the top, nearest the mode push-button. Most people like me have high frequency roll-off hearing loss and don’t need low frequency amplification. I need low frequencies to be just passed through at normal level, so for my initial setting I first gently turn this control through its full range so I know where its end positions are, then put it to its counter-clockwise end position, then turn it clockwise to about 1/3 of the way toward its clockwise end– on mine this is at about the 10 o’clock position.
The MPO AGC Automatic Gain Control is at the bottom, nearest the volume rocker switch. This control reduces the loudness of loud sounds down toward the loudness of normal sounds. One of my hearing problems just without hearing aids is loud sounds are too loud. Also the biggest problem I’ve had trying other people’s hearing aids is that loud sounds are much too loud. So I want loud sounds reduced as much as possible down toward normal loudness. The most reduction in loud sounds is at the maximum counter-clockwise position. So gently turn this control through its entire range to learn where its end positions are, then turn to its counter-clockwise end, then turn it clockwise just a tiny bit to just a small amount, 5%, toward its clockwise end. On mine this is at about the 7:30 o’clock position.
The G Gain Control is the left control, at middle between the loudness rocker switch and the mode push-button. This control adjusts loudness.
An explanation is needed:
1- The “outside” main rocker loudness switch has about eight steps between maximum and minimum loudness, and increases or decreases by one step whenever you press the up or down ends of the loudness rocker switch.
2- Whenever you turn your hearing aid on by rotating the battery into closed position, your loudness is automatically set to the middle of the eight steps.
3- You need to adjust the Gain Control screw so that, whenever you turn your inexpensive hearing aids on by putting in the battery, it turns on at your normal preferred louness setting.
So before adjusting the G Gain Control screw, first turn the hearing aid off by rotating its battery fully out, count to 10, and then turn the hearing aid back on by pushing the battery in, so its rocker loudness switch is at its automatic middle position.
Now by trial and error, adjust the left-side (middle-up-and-down, see trimmer’s picture) G Gain screw until loudness is what you want for normal use. Try it under different listening sound conditions, listening to different sounds. For testing I used the TV or the car radio. I try it at different television volume settings. It’s very important to try it also with different added background noises, like strong wind or a fan or road noise in a car at highway speeds, because such background noise reduces our ability to hear far more than most people realize.
For me, I adjusted the G Gain screw so that I could just almost tell that it was on, sort of just below where I could barely tell it was on, but high enough that I could hear a difference when I put it on. I can clearly tell it is on if I talk into my hand with my hand cupped toward that side. This initial attempt to adjust the G Gain screw put it at about 12 o’clock for me.
Readjust No. 1: After using it a bit, I found the high frequencies in my left ear, like “tinny” noises, were too loud. So I adjusted the left ear NH Low Frequency screw (at the top, next to the telephone button) a bit higher, to about the 12 o’clock position, thereby moving the total or center of the amplified sounds toward the low frequencies and away from the high frequencies, and readjusted the G Gain screw down from about 12 o’clock to 11 o’clock. And so far this seems about right.
Readjust No. 2: High frequencies in left ear (rattling newspaper pages) are still too loud, so I adjusted the left ear NH Low Frequency (top) screw higher to 2 o’clock, and the G Gain (left side) screw lower to 10 o’clock. This seems about right.
My left is now: NH= 65% 2 o’clock, G= 35% 10 o’clock, AGC= 5% 6:30 o’clock
My right is now: NH= 35% 10 o’clock, G= 50% 12 o’clock, AGC= 5% 6:30 o’clock
Doctor Paul
Hear-Better.Com
This article was originally written by “dabunting” and modified by Doctor Paul
CW = Clockwise CCW = Counter Clockwise

